DIY Digital Audio Player (DAP) Project No.2473

Lately I've been struggling with finding a suitable digital player for music playback. I thought I would share my experiences so far and provide an update on where I'm at with developing a replacement digital audio player (DAP).
For the past 7 years I've been using the Chord Mojo and Poly DAP.
I primarily listen to digital files store locally on the internal SD card. I only listen to streaming services such as Tidal as a secondary option in terms of sound quality. There is a degradation in sound quality when streaming music online or over wifi.
I purchased the Chord Mojo + Poly when it first came out which was probably a mistake. The Poly was plagued with software glitches that became very frustrating. I pressed on because of the great sound quality when play local files on the SD card.


Currently I'm still using the Mojo+Poly as it continues to provide excellent sound quality, however I'm pretty much fed up with its inconsistent playback and operation.
The silver lining with the Mojo+Poly is that it allowed me to hear what was possible from a digital streamer when the Poly is placed in Airplane Mode and music files sourced from its internal microSD card. The sound is simply stunning in this configuration and I've yet to hear better. The sound is noticeably superior to streaming from Tidal or from files located elsewhere in the house over Wifi (the Poly does not have a ethernet connection)
So I've been searching for a new streamer solution that will match the Poly's sonic capability and I've run into some road blocks. One streamer/DAC combo that caught my attention was the Eversolo DMP-A8 which was recently released. There are a half dozen rave reviews on YouTube regarding this unit...but I became concerned when slightly used units started showing up on the used market. Was it all hype? I'm not about to spend $2,800 CAD + 13% tax to find out.
I also tried out the Wiim Pro Music Streamer and while it is a robust and well designed unit, it does not have internal storage options. The only option for local playback is to use your home network and connect to other devices such as Network Attached Storage (NAS) or other local computer drivers via DNLA. I really did not want to rely on my home network as I've had too many issues with sound quality with this method.
The Raspberry Pi is a popular option for many DIY enthusiasts. It has an internal microSD card slot along with a host of other features. During covid I was researching a solution based on the Raspberry Pi, however at the time every vendor was sold out. Fast forward to now, and there is a new Raspberry Pi 5 readily available. My idea is simple. Use the Raspberry Pi to playback my music files from the MicroSD card slot.

- Run Raspberry Pi in Airplane Mode like I do with the Poly.
- There's no Airplane Mode technically with the Pi, but the idea is the same. I don't want to rely on noisy ethernet or wifi for my music.
- I can use music playback software such as VLC or Voluminio
- Voluminio can be controlled using the G20BTS PRO Bluetooth remote elminating the need for wifi.
- This was the idea behind the Chord Poly, being able to run without Wifi and use Bluetooth to control song playback. But it never worked consistently due to poor implementation. However when working, the sound was the best I've heard.
PSU

One option that I will try out is this Universal Filament Regulator from Neurochrome here in Canada. The idea here is simple, provide clean power to the Pi in hopes of improving overall sound quality.
The regulator requires 10V AC on the input. So I've purchased a wall wart from Mcmcaster Carr.
So to summarize the the physical configuration:
Step down transformer from AC mains (Wall wart 110V AC step down to 10V AC) to Neurochrome Universal Filament Supply (10V AC input to 5V DC output) to Raspberry Pi.
Sound Quality
I assembled the Raspberry Pi and installed Volumio as the operating system. I used the Volumio App to control playback. My music library had to be installed on a USB thumb drive since the Micro SD card is for the operating system only.
I then sent sound out of the Raspberry Pi via USB to my Chord Mojo DAC. Sound quality was sub-par and had a very digital sonic signature. The sound was flat and lifeless.
I decided to press on and look at other ways to improve the sound quality of the Raspberry Pi. I researched various Top Hats which assemble directly on top of the Pi and serve as an audio interface for better sound quality.
Ian Canada
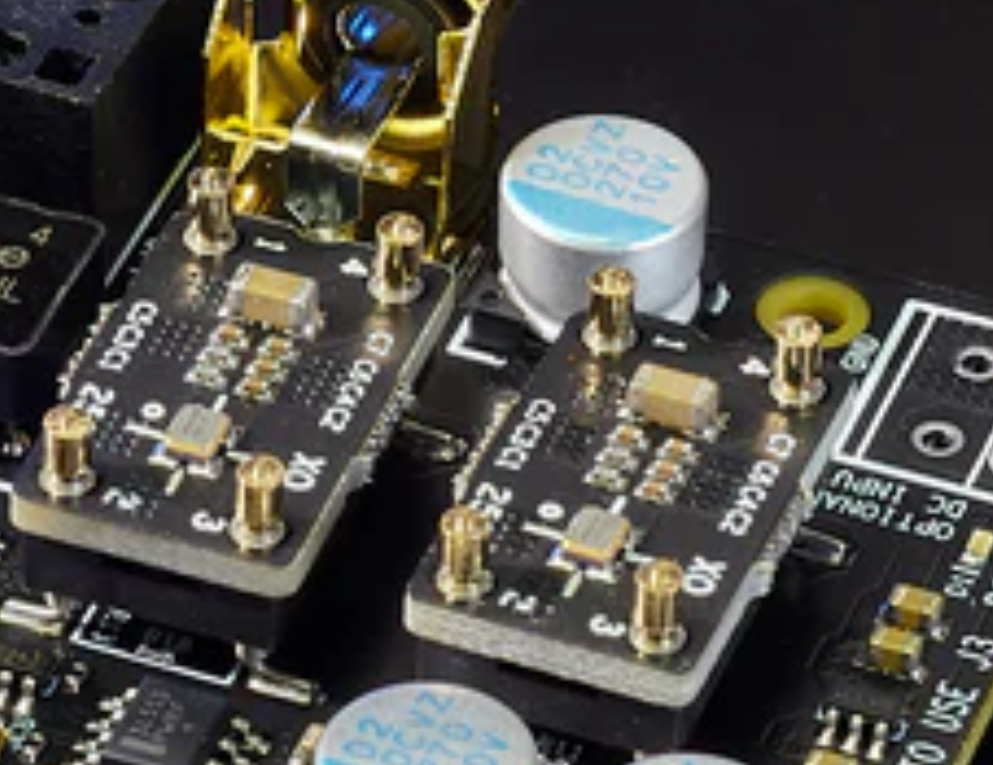
One top hat that caught my attention is the Transport Pi #20B which attaches to the Pi and provides digital out via coax. The Transport Pi #20B caught my attention in that it allows you to upgrade the stock physical clock chip installed on the Transport Pi#20B.

Below is the x2 clock chips that can be swapped out for higher precision units.

These physical chips can be replaced with the SC-Pure chip featured here. I went with #80A.
I contacted Ian Canada and asked about my plan. Ian repsonsed promptly and suggested that I also get the #47A UcPi Universal Ultracapacitor RPi Power Supply.
So to summarize, this is what I bought for my Rpi 5 based on recommendations by Ian at Ian Canada.
Items in this shipment |
|


The parts arrived and I had no trouble assembling the unit. You basically build it like a building starting with the first floor which is the #47A power supply. Then add the second floor which is the RPi5. The third floor is the #20B transport, all assembled using the provided stand-offs.


I then configured Volumio to activate the Is2 connection which is how the Rpi sends to the audio to the #20B transport.
Sound Quality with Ian Canada #20B, SC-Pure clock, and #47A PSU
The documentation for the SC-pure clock claims that the clock requires a 1 week break-in period. Initial listening confirmed that the sound was pretty bad. So I left the configuration setup playing music for a week and returned to listen. The sound definitely improved. It was now sounding very good! Everything was sounding much more natural and realistic.
Physical Noise coming from Chord Mojo DAC
After having the Chord Mojo DAC for seven years the battery was pretty much toast. So I removed the battery and simply ran it off a USB power supply. I was hoping this would get rid of a pesky mechanical noise from the Mojo which sounded like a high pitch wine. This was not noise from the audio signal, rather physical noise from the unit itself, similar to the noise from a cheap SMPS.
So I started looking for a replacement DAC.
Introducing the ROHM DAC Chip.
I don't recall what first put me onto this DAC chip but I believe I was looking for something musical but not overly warm so as to not compromise overall clarity. The ROHM chip out of Japan was interesting to me in that seemed to bridge the gap between the Topping DACs (clean, analytical) with the R2R DACS.
I found a used SMSL D300 online and decided to give it a try.

This DAC took the sound quality up another peg compared to the Chord Mojo DAC. Instruments and vocals seemed more separated. I even found that the D300 brought new life into some poorly recorded albums.
Summary of Costs
Raspberry Pi --- $100 USD
Neurochrome universal Filament Supply: --- $145 USD
Mcmaster Car Wall Wart: --- $24 USD
Ian Canada #20A, SC-Pure, #47 PSU --- $407 USD
SMSL D300 DAC (Used) --- $280 USD
128GB USB Thumb Drive --- $40
MicroSD card for operating system: --- $10
Total Cost: $1,006 USD.
I should note that Volumio requires a yearly subscription which is around $80 USD per year.
Replace RPi 5 with RPi 4
I was having glitching issues with the Volumio software. I was cautioned by Ian Canada that the #20B transport was not fully tested to work with the latest RPi5, so I replaced the RPi5 with the RPi4. This resolved the glitching issue. I should note that I did not need to do anything software related when swapping the 5 for the 4, which was interesting. The 4 was basically a drop-in replacement for the 5, requiring no changes other than physically replacing the units.
Stay tuned for more to come...
- Look at disabling Ethernet and Wi-Fi
- Connect touch screen
- Designing and building an enclosure
Conclusion
My digital playback has never sounded so good. I am very happy with the new player. It is now reliable, quiet, and easy to use.