Design Study --- Waveguide for Purifi 8"

With my recent failure to source a suitable horn and compression driver combo for project No.1736, I decide to go in a different direction. Following on the success of Horn No.1900 I decided to amalgamate the two projects and design a dedicated biradial for project No.1736 using the Peerless tweeter.
The Peerless OC25SC65-04 meets the required target for sound quality based on my own test results. So I will use this as a 'stand-in' tweeter until I can find something that exceeds it's performance. My only reservation on using the Peerless is it's very low cost, and associated negative optics of it being "cheap".
1736 Project Design Goals
- Provide a "turn-key" plan set including cabinet, waveguide, and crossover design using the Purifi 8" PTT8.0X04-NAB-02 as a 2-way stand-mount configuration.
Dedicated Biradial Requirements (Biradial No.2007)
- Well behaved off-axis response free from diffraction and coloration
- Pattern control down to 1kHz to match polar response of woofer
- Linear waveguide transfer function to minimize crossover complexity (The horn must have a perfectly flat frequency response with just a single capacitor high pass)
- Perfect physical time alignment between drivers (perfect step response for excellent coherency and dynamics)
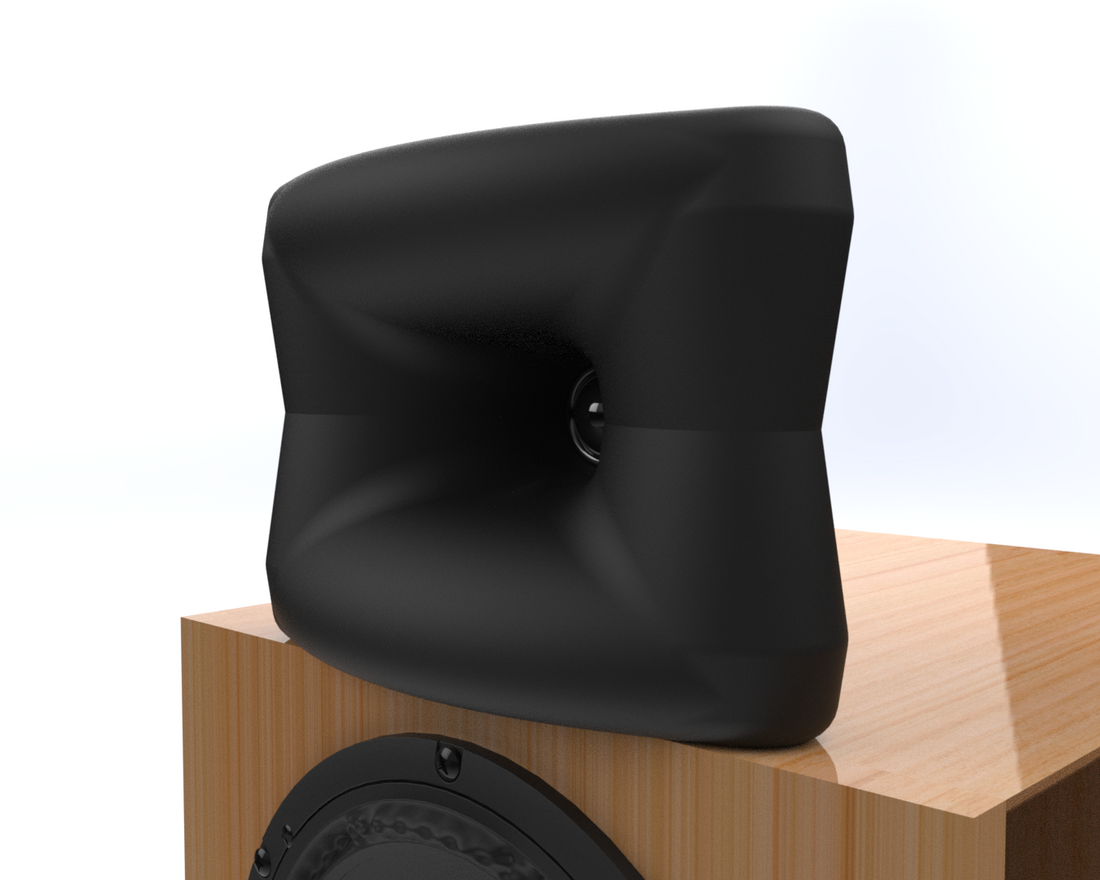
- Design a biradial that is easy to 3D print and fits within a standard 210mm x 210mm printer bed.
- Allow flexibility for further experimentation with other 25mm dome tweeters
- 60mm horn depth for loading close to 1kHz. Horn No.1900 was 50mm deep, so only slightly deeper on this biradial version.


3D Printing
Up until a few months ago I would have told you that I don't do 3D printing, however a local entrapranuer has started his own business 3D printing accessories for ATV's. He is providing top quality parts at a reasonable price, so I've been keeping him busy producing various prototypes. I have learned a lot from him on the 3D printing process, and I've used that knowledge to improve my horn designs so that they are easier to print.
The horn lays on it's back on the 3D printer bed pointing upwards. The horn measures 200mm wide x 150mm tall to fit on a standard 210mm x 210mm printer bed.

The design prevents difficult ceilings that would require support structures.
Below shows the physical time alignment of the waveguide along with the ES horn flare curvature with wrap-around to -45 degrees at the backside of the waveguide.


Below I show the 8 degree draft angle in the throat to minimize standing waves. (dual arrows), along with the 3mm high throat bump on the floor and ceiling of throat for the same purpose. (single arrow)

Why Biradial?
The biradial design allows for closer driver spacing versus a comparable circular horn. I've also directly compared circular horns against a similar biradial and I found that the biradial loaded the treble frequencies more and allowed higher sensitivity in the upper treble, reducing distortion. Both circular and biradial sound excellent, but if I had to choose, my preference is birdadial because of it's sound character.
Status
I'm am currently having x2 horns printed. For reference this is Horn No.2007.
Stay tuned for test results!